Thursday, January 23, 2014

Solution for "Shortcut Virus" Problem of Your Pen Drive and pc


Shortcut Virus


A critical problem happens when your pen drive's all file become only a shortcut though the file was important one. Today I'll show you how to get back your lost file and delete shortcut virus.

Delete Shortcut Virus and Regain Lost Files.


While browsing computers a terrible thing happens when your pen drive goes into another computer for transferring data. You get your files as a "Shortcut", nothing more.
Very disappointing to see your files and folders are gone some where, Only there are some shortcut files or folders in pen drive. 

Cause:-  A virus most famous as "Shortcut Virus".
Just you have to do is to delete this virus and have to regain your files with some easy steps.

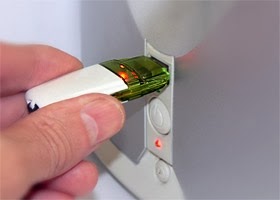
Step 1:- Inserting your affected Pen-Drive into computer.

First you have to know the drive latter of your pen-drive by inserting it in your computer. It may very with another computer. When you will insert your pen-drive into computer you can see the drive latter in "Removable Disks" area as like the picture below.

Insert your pen-drive into computer.


You can see the drive latter like below. You should have to remember it till last.


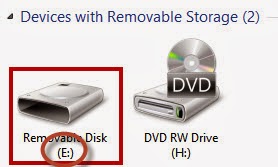
Here "E" is my removable drive latter. Yours may another, whatever remember it.


Step 2:-

ii) Through Bat file

You can do all the manual steps easily with some experience in CMD. For the people who don’t know that and who are lazy you can use the bat file i created all you need to do is just one click
 Now this is unique method you will not be able to find such a simple method to remove "shortcut virus"
All other sites tell you to type code in CMD and do this..... or do that .... it becomes very difficult sometime 


Instructions:
you must copy the batch file in the infected disk. And then run it .
So copy the file to the infected drive and the run it. it will ask you  whether to continue or not, just hit enter and it will do the job
this batch file is copyrighted and it is original content developed by hackingwithpriyanshu.So pls avoid copying it. 


Immediately Copy Your Real Files and Folders From Pen Drive Into Your Computer.
After copying files and folders "Format" your pen drive.

So, That's It. Enjoy your virus free pen drive again.

No more today, I'll back with another post next.

Monday, December 2, 2013

How to Hide any Local Drive using Command prompt


Today HACKING WITH PRIYANSHU post is about how to hide a local drive without any 3rd party software. There are lots of free and payable software's available to hide local drive, but I'm not gonna talk about hide a local drive using a software. In this tutorial I'll show you an easiest way to hide local drive without using software. This will save your both money and time.

There are 3 methods available to hide a local drive without using any software

1. Hide a drive through gpedit
2. Hide a drive through regedit
3. Hide a drive using command prompt

Today we are covering command prompt way of doing it. So lets see how to do.


How to Hide any Local Drive using Command prompt

How to Hide a Local Drive using command prompt?

1. Click on Start - Run

2. In Run box type cmd and hit Enter. Now Command Prompt window will appear.

3. In command prompt, type diskpart and hit Enter.

4. Then type list volume and hit Enter.

Now it will display the list of all your computer drives details.


5. Then type the Drive Letter which you want to hide.
If you want to hide volume E, type select volume E and hit Enter.

Now follow mentioned massage will appear to you.
Volume 4 is the selected volume


How to Hide any Local Drive using Command prompt


6. After that, type remove letter E and hit an Enter. 

That's all, you have done. Now restart your computer once. When you start your PC again, you want be able to see the
 particular drive in My Computer.


How to get back Hidden Drive again in My Computer.

Do the procedure which i have mentioned in step 1,2,3,4 and 5 again.

Click Start --> Run --> cmd -->

Then type diskpart - list volume - select volume E

After that type assign letter E and hit Enter.

That's all !! You have got back the hidden local drive. Once again restart your PC, now you will be able to see hidden local drive in My Computer.

Thursday, November 7, 2013

How to Get Samsung Galaxy S4 Features on Any Android Phone

Samsung Galaxy S4 a Flagship Phone for Samsung. Without any doubt it’s an awesome phone but with a high price tag, which everyone can't afford. But don't be Disappointed here we gonna discuss how to dub some of the Galaxy S4 features in to a Simple Android Device.
s4+features+on+your+android+mobile


Every Android User is willing to use Air Call, TouchWiz UX and AccuWeather clock which comes preloaded in Galaxy S4.But for Experiencing these features you don't have to buy a Samsung Galaxy S4 you can get a feel of this features in you simple Android device. So now let’s head over to our Topic "How to transform a simple android device into Galaxy S4".

About the Air Gesture:-

This App will allow you to answer calls on your device with a gesture only without touching the phone. You can also answer calls by bringing the phone near too your ear. This Feature comes per-loaded with Samsung Galaxy S4 but here we will install it into a simple Android device. First of All lets have a look how this technology works, whenever you hover your hand above the mobile to answer the call it activates the proximity sensor which able you to answer the call directly.
galaxy_s4_air_gesture

But what will happen if the mobile in your pocket Then? Don't worry the Developer of this app has worked hard and added a feature in this app which is "PockeMode". This feature is like silent mode, when you activate silent mode in your mobile you phone won't ring; same function has this feature also after enabling it will prevent you device to answer the call when the device is your pocket. To answer the Call you have to first take out the device wave you hand above the sensor and after that take it to the ear. It has many other features like Loud Speaker, vibration, On-Screen message, etc.

Things to be needed in this Process:-

1.Installing Air Gesture On  you Android Device:

  • Download the Air View App From the Play Store: Download Here
  • After Downloading, Install the app which we will take hardly 2 minutes.
  • After Installing the app, Simply run the Air gesture App.
  • When you run the app first time, it will ask you to Turn On-Air Call. Just Click ON.
  • After turning the App On, it will show all the feature which we discussed above. Just Click on the features which you want to turn ON.
  • Enjoy Air gesture on you Device.

2.Changing the icons of your device into S4:-

  • Unzip the Icon Pack zip File Downloaded from the above link. The Extracted file contains the ported icons of Galaxy S4.
  • Now for Further installation you need Icon Changer app From the App Market:Download From here.
changing+the+icons
  • Now Start Icon Changer App and select the app of which icon you want to change.
  • Now Browse the new icon by which you want to replace the old one.
  • Choose the New icon and you are Done.
  • Now Repeat above steps for each of which icon you want to change.

3.Installing Galaxy S4 Launcher and AccuWeather:-

Note:-For this Procedure your Device must be Rooted.Take a backup before only to be on a safer side

S4-Launcher-and-AccuWeather-Widget
  • Place the Samsung Galaxy S4 launcher zip file (Downloaded from the above link) in the root directory of your device SD card but don't extract the zip file.
  • Boot your Device into Recovery mode and then wipe the dalvik cache.
  • Again go to main recovery menu and then select "Install Zip from SD card", then select "Choose Zip file from SD card" and then select the zip file.
  • After the Installation, Reboot your device.
  • As your device Boots up, tap the home button of your device to launch the Galaxy S4 Launcher.
  • To install the AccuWeather, place the Downloaded zip file and install it via Custom Recovery as you have done for the launcher.
Hmm! all done but something is missing. Yeah!!! Samsung Galaxy S4 live wallpapers!!!!

4.Samsung Galaxy S4 Live Wallpaper

Download and install them and have fun : Download Link

So guys i hope you all enjoyed it a lot. If u like our work please don't forget to write a word of thanks in comments!!

Tuesday, October 15, 2013

Control Windows Media Player With Hand Gestures Using Flutter

TODAY I HAV BRING SOMETHING INNOVATIVE ND CREATIVE TO YOU TRUST ME GUYS YOU SURELY GOING TO LOVE IT !!!


Ever thought if you could play/pause the video being played on your system by just raising your hand? If yes, then this is possible with Flutter. Flutter is an application for both Mac And Windows that allows you to control your Windows Music Player, Winamp, VLC, iTunes, Spotify, etc. through hand gestures. The technique takes benefit of your webcam to sense your hand.
control media player with hand gestures image1 650x326

What You Require To Use Flutter :

  • A PC with Windows or Macintosh installed.
  • A webcam, either external or the Laptop’s internal webcam.
  • A supported media player, full list is given on the official website.

Technique Behind Flutter :

A webcam attached to your system monitors you all the time when the Flutter app is running. The Flutter app always waits for a signal from your webcam that shows an open hand, more precisely a signal we use for stop. Whenever it notices your hand up in the air it sends a signal to the CPU to start/stop the play. See the below image to see what exactly happens.
control media player with hand gestures technique11 650x284

How To Use Flutter :

    • Just install the Flutter app from their official site.
    • Run the app and start an audio or a video file in any one of the supported media player.
    • Make sure your webcam is working properly and just raise your hand in front of your webcam.

Thursday, September 19, 2013

3 Ways To Share Internet Connection in Windows 7


Today, in an internet driven world, everything we learn, we make, we use, the internet plays a major role. And to utilize the power of the internet, we today use a lot of gadgets, like the tablets, the laptops and the smartphones. Even a typical nuclear family normally has more than five-six devices, that are internet ready.
But sometimes, the router given by the Internet ServiceProvider is set to limit the number of devices that can be simultaneously connected to it. This is done to restrict the bandwidth usage. In these situations, you can make your own WiFi hotspot and share your internet connection using your Windows 7 PC/Laptop. You can also share your internet connection even if you are using a 3G/4G Dongle or you are connected to the internet through the LAN cable.
We have 3 different ways by which you can share your internet connection. The first two are the third-party applications and the third one is by using the inbuilt feature of Windows 7.

Share InternetConnecting Using mHotspot

mHotspot is a free application that turns your WiFi ready laptop into a hotspot, to which other devices can connect and access the internet.
  1.   First install mHotspot on your Windows 7 machine, which will do the internet sharing.
  2. Run the application. The interface is quite clean and there are not many options to confuse you.
  3. mHotspot
  4. Give your hotspot a name in the “Hotspot Name” field.
  5. Give a password in “Password” field.
  6. Choose your Wifi adapter from the drop-down list in the “Share from” field.
  7. Choose the maximum number of devices that can be connected to your hotspot, in the “Max Clients” field.
  8. After doing all this, Click the “Start Hotspot” button.
After successful connection, you will receive a message confirming that the Hotspot has started successfully. Now you can connect up to 10 WiFi capable devices to this Hotspot and enjoy internet capabilities on all your devices.
You can even monitor the devices connected to your Hotspot, go to the clients tab in the right pane to do that.
mHotspot Clients
To choose the network that is connected to the internet and from which you want to do the sharing, go to the “Network” tab and select the connection from the drop-down list.

mHotspot Features at a Glance

  1. You can connect upto 10 devices
  2. You can set any name of your Hotspot and protect it with WPA2 PSK security.
  3. You can see the bandwidth consumption by your network.
  4. The mHotspot application works with Windows 7 and Windows 8.
  5. You can monitor the devices connected to your Hotspot.
  6. Any WiFi capable device can get access to your hotspot, be it an ipad, iPhone, laptops, PCs, tablets or smartphones.
  7. You can easily share 3G/4G dongle, WiFi connection or any wired connection.
  8. This can also be used as a range extender, as the hotspot can be placed in between your router and your connecting device.
  9. You can set the maximum number of devices that can connect to your Hotspot.

Use Connectify Hotspot to share Your Internet Connection in Windows

Connectify share your internet connection
As mHotspot, Connectify is another application that lets you share any type of internet connection over WiFi. But the free version, Connectify Lite, does not allow you to share your 3G/4G connection. This can be done by purchasing their paid product, Connectify Pro.
Connectify Pro also has a unique Fling feature, which allows you to drag and drop files from one device to another. This is done even when you don’t have a working internet connection. It keeps you from the hassle of using USB drives and emailing files to yourself.
Even if you are not connected to a router, you can still access the shared folders of one device from another.

Share Internet Connection Using Windows 7 Built-in Features

Unlike the above mentioned applications, you need to do some extra work to get it working. This also has a drawback, you can not share your connection with the same WiFi adapter from which you are connected to the internet. You can either share a LAN/ethernet or a USB connection or you need to have two WiFi adapters. But this relieves you from installing any third-party app.
  1. Go to the “Control Panel” and then the “Network and Sharing Center”.
  2. Now find the “Set up a new connection or network” option and click on it.
  3. set up a new connection
  4. Now in the window that pops up, select the “Set up a wireless ad hoc network” option.
  5. set up a wireless ad hoc network
  6. Then give your network a name, and set up a WPA2 password. Check the “Save this network” checkbox.
  7. wireless ad hoc network details
    NOTE Keep your password as complicated as possible.
  8. Now in the taskbar area, you will see the network you just set-up is waiting for the users to join your network.
  9. ad hoc network status
  10. Now you need to allow internet sharing over this network. For this, go to the “Control Panel > Network and Sharing Center” and then select “Change adapter settings” from the left pane.
  11. Change Adapter Settings
  12. Now choose the adapter which you are using to connect to the internet, “Local Area Connection” in my case. Right-click on it and select “Properties”. Now go to the “Sharing” tab and check both the check boxes to allow other network users to connect to and disable this computer’s internet connection.
  13. Share Internet Connection
REMEMBER Disconnecting from this network is same as stopping the network and connecting is same as turning it back on.
If you have followed all the above steps, you would have successfully made your Windows 7 machine, a hotspot with internet sharing capabilities.

Thursday, September 5, 2013

HOW TO: Make your computer talk like Iron man's Jarvis

You Must have Watched The Movie "IRON MAN","The Avengers" and Tony Stark's Talking Computer "jarvis". Despite being busy, i saw the movie "iron" few months ago and since then I was thinking to make something like "Jarvis"


The project development on "human computer interface" and "Gestural interface" has already been started by my side, which are capable of having feature like voice recognition,gestural interfaces. Some of those projects have been partially developed and working in desired manner, but few features and modules are yet to implement and on their way of completion in very short span of time.

So lets come to the body of this article.The reason of writing this post for my readers is to share what I've achieved till yet in this journey of Artificial Intelligence. Here is one gift GIFT for my readers in the form of a PROJECT with the topic "how make your computer talk like Jarvis".
Jarvis is totally based on Artificial intelligence aka Artificial Brain. Eventually, we can't such a huge artificial brain by using these following steps because of the simplicity and efficiency of this project. But I can make you assure that after this you make your computer talk, and this will be your first interestingly step in the world of Artificial intelligence. And later, you can go in more deeper as soon as you'll come to know its depth.So Lets start with your first step in this world with this example :

Example 1 :
Give a Name to your Computer  Like "Jarvis" and when you'll say "Jarvis" it will reply "Hello sir" or "Hello Mr. (Your Name)".
 or
You : Who are you ??
Computer : I'm chitti The robo Speed, 1 terahertz, memory, one  zettabyte
(Just Like Rajnikanth's Moive "robot", (Enthiran) in Tamil.)

Example 2 :
YOU:  Good Morning Jarvis !
COMPUTER : Good Morning Mr. Stark ! how are you Today !

So, Little wondering how these things going to work out ? Here you can transform your wondering into reality. Follow these codes :

Example 1 : 
<listenFor>Jarvis</listenFor>
<speak>Hello Mr. STark</speak>
</command>
</speechMacros>

Example 2 :
<listenFor>Good Morning Jarvis</listenFor>
<speak>Good Morning Sir. how are you today</speak>
</command>
</speechMacros>

Further, more you can use these lines of codes for Shutting down Computer :
<speechMacros>
<command>
<listenFor>Nuke it</listenFor>
<speak>Restarting Windows</speak>
<run command="C:\Windows\System32\shutdown.exe"/>
</command>
</speechMacros>

To make it more intresting and realastic you need a bit knwoledge of VB.NET
here is one example

<speechMacros>
<command>
<listenFor>Time</listenFor>
<listenFor>Give me the Time</listenFor>
<listenFor>What is the time</listenFor>
<listenFor>Tell me the time</listenFor>
<listenFor>What time is it</listenFor>
<script language="vbscript">
<![CDATA[
dim currentTime
currentTime = FormatDateTime(Time(), 1)
Application.Speak Time
Application.SetTextFeedback Time
]]>
</script>
</command>

now i have ms exel work then..

<command priority="100">
  <listenFor>insert row above</listenFor>
  <sendKeys>{ALT}jla</sendKeys>
</command>
<command priority="100">
  <listenFor>insert row below</listenFor>
  <sendKeys>{ALT}jle</sendKeys>
</command>
<command priority="100">
  <listenFor>insert column before</listenFor>
  <sendKeys>{ALT}jll</sendKeys>
</command>
<command priority="100">
  <listenFor>insert column after</listenFor>
  <sendKeys>{ALT}jlr</sendKeys>
</command>
<command priority="100">
  <listenFor>merge cells</listenFor>
  <sendKeys>{ALT}jlm</sendKeys>
</command>
<command priority="100">
  <listenFor>split table</listenFor>
  <sendKeys>{ALT}jlq</sendKeys>
</command>
<command priority="100">
  <listenFor>delte row</listenFor>
  <listenFor>delte rows</listenFor>
  <sendKeys>{ALT}jdr</sendKeys>
</command>
<command priority="100">
  <listenFor>delete column</listenFor>
  <listenFor>delete columns</listenFor>
  <sendKeys>{ALT}jdc</sendKeys>
</command>
<command priority="100">
  <listenFor>?show table properties</listenFor>
  <sendKeys>{ALT}jdo</sendKeys>
</command>
<command priority="100">
  <listenFor>?show ?hide table gridlines</listenFor>
  <sendKeys>{ALT}jltg</sendKeys>
</command>

Track chnages in Music
<command priority="100">
  <listenFor>next change</listenFor>
  <sendKeys>{ALT}rh</sendKeys>
</command>
<command priority="100">
  <listenFor>accept change</listenFor>
  <sendKeys>{ALT}rac</sendKeys>
</command> 

To click
<command priority="100">
 <listenFor>?mouse click</listenFor>   <mouse button="left" command="click" />
</command>
if you need codes of any command leave comment below, and i will try to give you source codes.

How to Get Started  ??
Things you need -
A microphone or internal Microphone
windows 7 and windows speech macros, download it from here
install it then make Macros to start work 
Now open notepad and paste code in notepad 
for example 
<listenFor>Jarvis</listenFor>
<speak>Hello Mr. STark</speak>
</command>
</speechMacros>
paste it and save as filename.WSRMac
.WSRMac extention is must for it,
then Goto your WSRMac file and click on
Now click on "import signing Cerificate" and automaticly it will save a digital signature for it.

cats2.jpg (320×194)
Now open Speech recognition

Now Give Your Instructions, you can minizmise to hide this window

Enjoy Talking to your Computer ! :D